

You probably know by now that Google is sunsetting Universal Analytics in favor of their new GA4 analytics. As of July 1, 2023, Universal Analytics will no longer be collecting data. If you've already created a GA4 account you may still be getting emails containing warnings that you need to “take action on your Google Analytics account before July 1, 2023.”
If you haven't made your GA4 account, you should do so now. We created a guide for getting a new account set up that you can view here if you need some help. If you have already made that new GA4 account, then there are a couple of loose ends you should tie up to make sure that everything goes smoothly on July 1st (and to stop those confusing emails about “taking action” when you've already done so).
tldr; You need to connect your GA4 and Universal Analytics account to stop the emails, and you need to make sure the new GA4 code is installed on the website.
Connecting Universal Analytics and an existing Google Analytics 4 Property
You may receive emails asking you to set up your GA4 property, even if you've already created one. This is because Google wants you to link your Universal Analytics property to your new GA4 property. Even if you've already told Google ‘no' to an automatic migration of your Universal Analytics data.
If you want to stop Google from Auto Creating a new GA4 account, you can use the Setup Assistant to disable the action. Here's how:
When logged into your Universal Analytics account you'll likely see a countdown timer if Google doesn't see that your UA and GA4 accounts are connected. Click the blue button titled “Go To Setup Assistant”.

In the setup assistant, you're given two options and a toggle switch.
Go straight to the bottom and turn the toggle switch OFF. This will stop Google from automatically creating a new property for you.
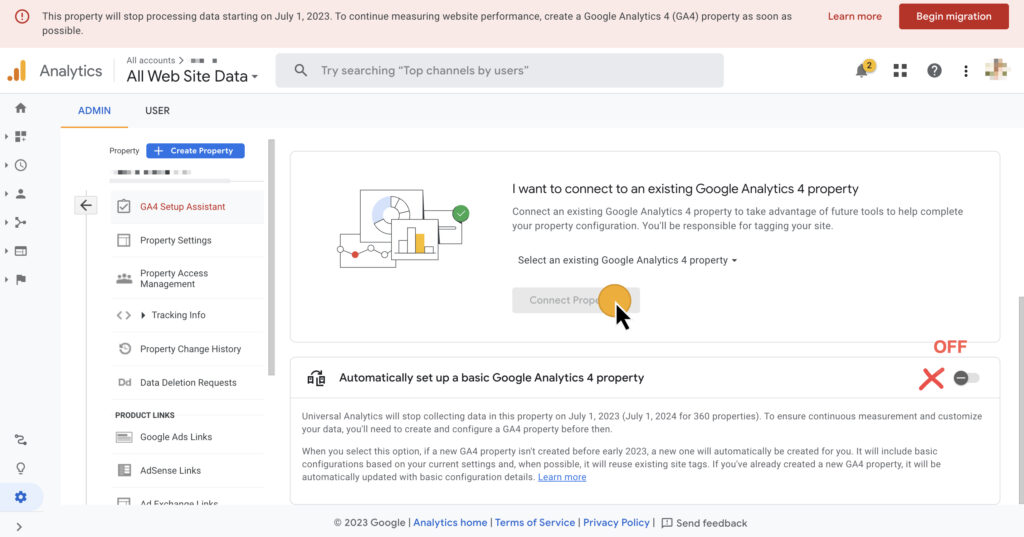
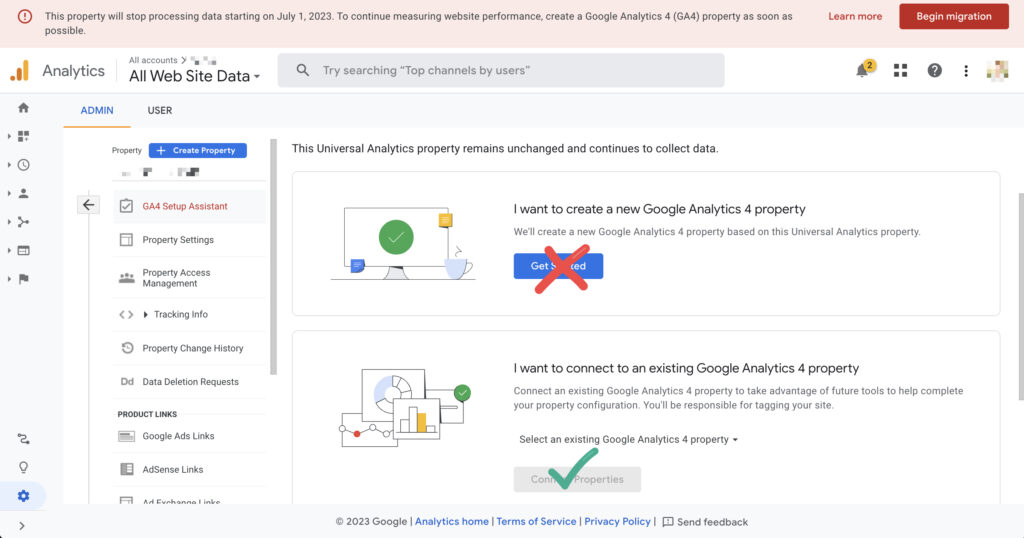
Above the toggle, you have two options: ‘Create a New Google Analytics 4 Property' or ‘Connect an Existing Google Analytics 4 Property'. Select ‘Connect an Existing Google Analytics 4 Property' and navigate to the one you've already made.
Don't forget the Google Tags
If you create a new property Google will connect your existing Universal Analytics tracking code to the new Google Analytics 4 property.
If you already have a Google Analytics 4 property and don't have any custom metrics or settings to migrate, you should install the new GA4 code on your site. If you do have goals, custom metrics, or other configurations to migrate, it's a little more complicated than what we've laid out here. You can check out the guide mentioned above to help you migrate that data.
When installing a Google Tag of any kind on your WordPress website, it's important to use a snippets tool or existing options within the theme settings if they exist. In years past, it was popular to embed the UA codes directly into the theme code. So, make sure you don't have any old tags lingering if you haven't changed your theme or updated your website in some time.
Check on your Data Streams
Google makes the transition to GA4 seem pretty seamless in their email communications, but the truth is: for sites that rely heavily on Universal Analytics, it can get complicated. Be aware of your data streams and test to ensure that the information you need is getting through.
Google has moved and eliminated quite a few options and views, so while it may be a bit labor-intensive, it's worth checking to make sure your new GA4 account is operating properly on your own, rather than blindly trusting the process.
Once you've completed the steps above, you can visit the documentation to understand a bit more about how Google is changing the data collection process and how you can find or install your Google tags correctly.